Working with tooltips
everviz comes with a powerful tooltip editor. This document explains how you can change the content and layout for your tooltips.
Tooltip editor
We are going to use this chart as a starting point for the different tooltip configurations.
If you use your mouse to hover the plot area, you will see the tooltip appearing with more information.
To configure the tooltip:
- Go to Customize > Tooltip in the menu

Take note of the "Apply to" section. Selecting "All Series" will apply your customizations to every series in the chart. If you prefer to customize a specific series, simply select the one you want to modify.

Enable or disable tooltip
If you want to turn off tooltips in your charts, simply uncheck Enable tooltip.
To show tooltips, ensure that the Enable tooltip box is checked.
Show all series in the tooltip
If you want to display data from all series values when your reader is hovering the mouse over a certain point, you can do this by checking Show all series.
Based on the chart we are showing in the top of this article, the tooltip would look as follows when enabling "Show all series".
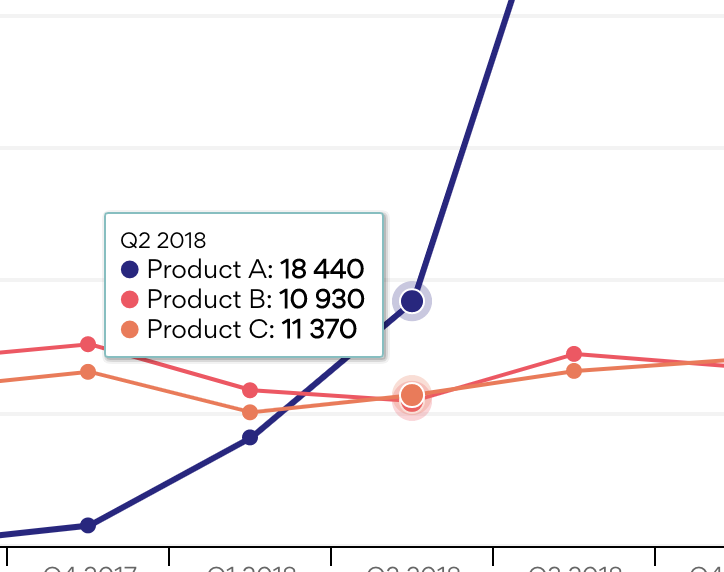
See how this change will affect the tooltip with displaying values for every serie instead of just one.
Change content in the Tooltip
A tooltip consists of a header and a body.
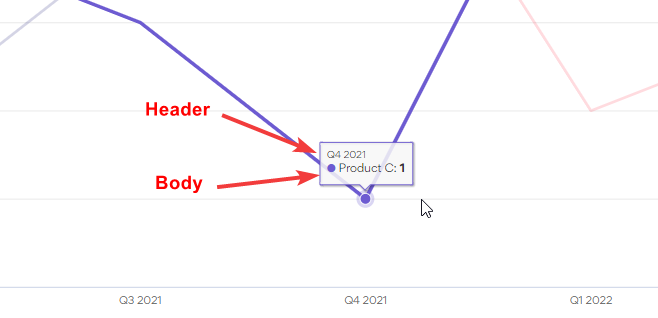
The content of these fields can be changed in two different fields in the Tooltip editor.

Both of these fields allow you to add text, variables, prefixes, suffixes and customize the layout.
Add text to the tooltip
Choose any of the fields, Header and Body and insert desired. Use the styling options in the toolbar to change font-weight, color, size, alignment font etc.
One typical scenario is to add a prefix or suffix in the tooltip. The example below shows how this is achieved to explain that the numbers are in $ USD.

Data values can be inserted as variables. Variables can be identified within brackets {}. In the example above {point.key}, {series.name} and {point.y} are all variables.
To add more a new data value, choose a variable from the Add information from data list box and click the Plus icon. This will insert the variable in the relevant field.
Change the tooltip design
In the tooltip editor you can also change the design of the tooltip.

Use the controls to select background color, border color, border radius and width.
Advanced options
How to add the date to tooltip?
To set a customized date in the tooltip:
Go to Customize > Advanced > Tooltip > X Date Format. In the X Date Format field write the customized date format. For example, to visualize the month and the year, write %B %Y, where %B represents the month and %Y the year.
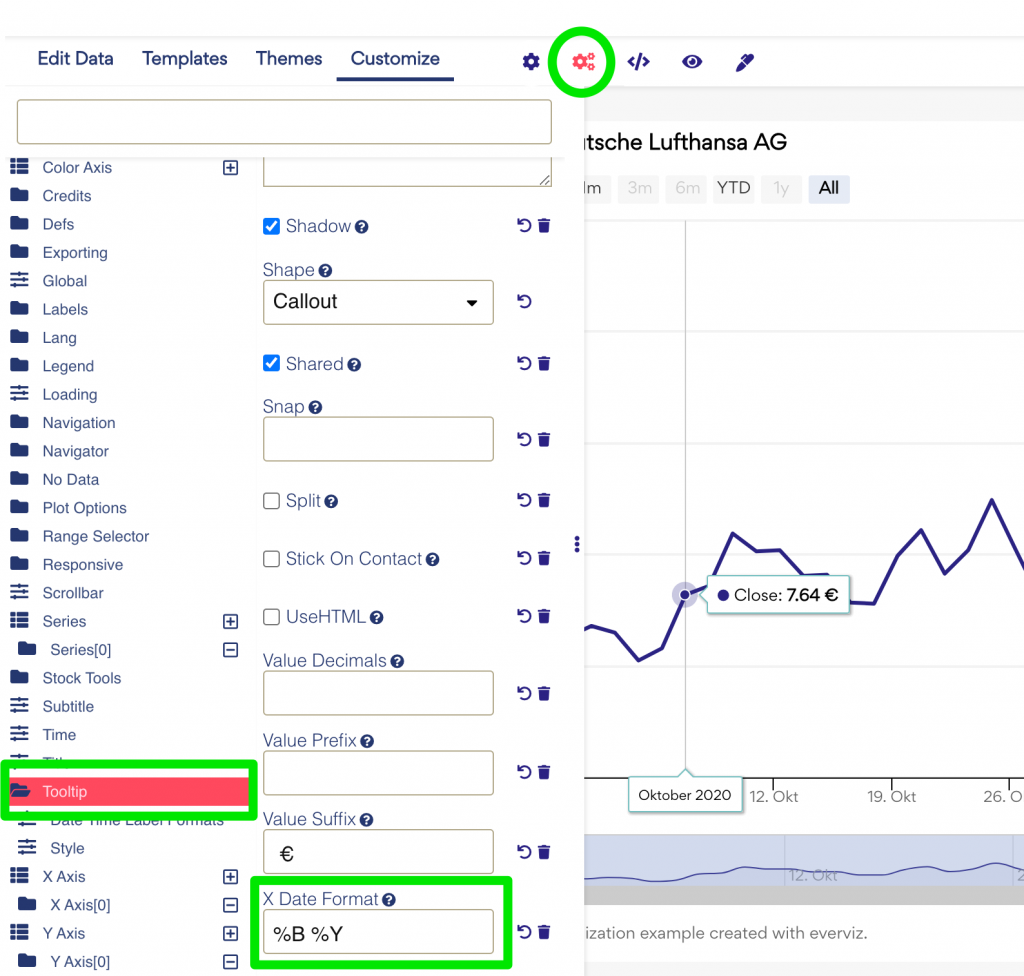
Note! These parameters are case sensitive. Lowercase
Check all date reference in this list:
* millisecond: %L * second: %S * minute: %M * hour: %H * day: %A * week: %e * month: %B * year: %Y
Tooltip string formatters
You can use C-style string formatters to quickly format any individual data variable:
{point.y:.0f} gives no decimals
{point.y:.2f} gives two decimals
{point.y:,.2f} gives two decimals with a comma as a thousands-separator.

You can also format dates using the formatting convention described above in How to add the date to tooltip. For instance, the above example can also be written as {point.key: %B %Y} directly in the tooltip editor by customizing the Header section.
How do I add a decimal separator to my numbers in the tooltip?
Go to Customize > Localization > Number Formatting > Decimal separator and type in the separator you want such as a comma or period.

How do I add a thousands-separator to my numbers in the tooltip?
Go to Customize > Localization > Number Formatting -> Thousands separator and type in the separator you want to indicate thousands, such as a comma.

How to add signs ($, %, etc.) to the tooltip?
To add signs such as $ or % go to:
- Customize > Tooltip > Body
- Then add the sign, for example the euro sign (€)
